Hiya guys!!
Okay so this post in case you can't tell is Christmas related woop woop!! Now the idea of this post was to show you some Christmas nail art, however i did my nails at college last week and i kid you not the polish has not chipped a single bit!! And I'm the kinda girl who doesn't like to take perfectly good nail polish off for no reason whatsoever......
All is not lost tho!! i do have a few pictures from nail art in past years, just remember they are a few years old so aren't the best :-/ Also my nails were teeny tiny at this point - guess it's just good to show different designs for people with shorter nails!!
Right on with the pictures!!!
First is my rudolph one.....
First thing to say about this is i cannot begin to explain how easy this was to achieve!! i ended up doing all 10 nails in this design last year as it was just so simple but looked really good too.
You start of with the base coat - of course. I picked bright blue but you can pick any colour really, i wouldn't suggest black tho as the reindeer won't show very well. I think white would look pretty awesome tho.
Next i took my brown nail art pen and just drew a circle and "coloured" it in - easy peasy!!
The step after is take another brown which is lighter then the one you used for the circle (i used gold) and simply painted a 2 crosses on the top of the head for the antlers. If you have longer nails you can obviously make the antlers longer just do what you can.
And the final step is 2 blue dots in the circle for eyes and a red dot for the nose!!
And ta da!! done!! Something which does look REALLY good is if you have any little red gems, stick one of those in place of the nose. This can be done with nail glue or simply putting it on wet nail polish.
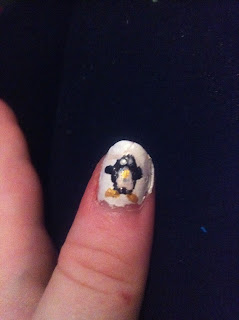
Number 2 is a penguin
Again short nail alert!! and very very simple!!
Start off with the base coat. I used white, obviously you can use different colours but i really do think white is the best for this particular design.
Next take a black nail art pen and do an oval shape in the middle for the penguins body and fill it in. Then do 2 little ovals either side for the arms.
After that take a gold nail art pen and do 2 thick lines at the bottom for the penguins feet (orange can be a suitable substitute)
Ensuring the black oval in the middle is dry, do a smaller white oval in the middle and fill it in for the penguins tummy.
Finally do 2 white dots in the black oval for the eyes and a little gold one for the beak.
This one may quite possibly be most simplest design ever!! but really effective too!!
Start off with a dark brown base coat - the darker the better!!
Make sure it is really really dry otherwise the colours will blend when doing the next step and that's not good!! Next take a white nail art pen - see the importance now?? pink icing on christmas cake is a no go!! Simply do a wavy line about a quarter of the way down the nail and fill the top part in.
Once that is dry take a green nail art pen and do two squiggly shapes for the leaves. If you have longer nails you can get more detail on for the leaves. And finish it off with a few red dots for the berries and there you go!!
I just want to take this opportunity to everyone who has looked at my blog, it means an awful lot!! i didn't think i'd reach 100 views and i smashed the 400 mark which is just amazing.
Hope you all have a wonderful christmas and a very happy 2013.
Love
Rhiannydd
p.s. here's a few cheeky pictures of my nails i did at college!! still a bit festive with the glitter :D
see the difference in nail lengths!! told you they were teeny tiny last year haha!!


